A Beijing layover is a great chance to explore, but China’s “Great Firewall” makes staying connected tricky. Without the right plan, you’ll likely find blocked access to essential apps like Google Maps, WhatsApp, and even your banking tools. Whether you have a few hours or a full day, choosing the right connectivity option is key. […]
How to transfer eSIM from one iPhone to another step-by-step
Learn how to transfer eSIM from one iPhone to another with and without a carrier, step-by-step.
Transferring eSIM from one iPhone to another is not straightforward, so people are often be confused when executing this action. To help you out, this guide will instruct you step-by-step through different practical eSIM transfer methods.
Here you will learn:
- How many ways to transfer eSIM from iPhone to another after setup.
- Transfer eSIM between iPhones after setup with Quick Transfer, without carrier.
- Transfer eSIM from the old iPhone to the new iPhone after setup via Bluetooth.
- Transfer eSIM from iPhone to iPhone manually.
- Troubleshooting eSIM transferring issues.
In this article
I. Basics about eSIM Transfer on iPhone
Before learning step-by-step methods to transfer eSIM between iPhones, it is essential to know more about eSIM transfer:
1. When do I need to transfer eSIM between iPhones?
People often need to transfer eSIM when:
- Upgrading to a new iPhone.
- Replacing a damaged or lost iPhone.
- Switching between personal and work iPhones.
- Changing mobile carriers.
- Reseting or restoring your iPhone.
- Sharing an iPhone with family members.
The main reasons to transfer an eSIM between iPhones are to maintain cellular service, data plans, phone numbers when getting a new iPhone or changing iPhones for certain reasons. The specific transferring steps may vary by carrier, but in this guide, we will give general guidance on the eSIM transfer process.
2. eSIM transfer from one iPhone to another during setup
You can transfer eSIM while setting up the iPhone at the beginning. While setting up your new iPhone, you will get a message about transferring your mobile service plan. If having this message, you can transfer eSIM during setup. However, be aware that not many cellular carriers offer this feature.
3. How many ways to transfer eSIM between iPhones after setup
There are 03 main ways to transfer your eSIM from one iPhone to another:
Method 1: Use the eSIM Quick Transfer
This method works if your mobile carrier supports automatic eSIM transfer process.
Method 2: Transfer eSIM via bluetooth
This method works for those iPhone 15/14 series running on iOS 16/17.
Method 3: Transfer eSIM manually
This methods applies if your cellular carrier DOES NOT support automated eSIM transfer.
You can do it manually in 02 ways:
- Scan the QR code provided by your carrier.
- Enter the activation manually if the QR code scan does not work. It may take a bit more time than the other options.
4. What is eSIM Quick Transfer Feature on iPhone?
eSIM Quick Transfer is a new and effective way to move an eSIM from one iOS device to another without having to contact the cellular carrier. Popular eSIM transfer methods involve contacting the carrier to request a new QR code or eSIM pofile information. By using eSIM Quick Transfer, you can move an eSIM between iPhones locally via bluetooth.
However, you need to know that NOT all mobile operators support “automatic” eSIM transfer or Quick Transfer.
► Find out which wireless carriers that support eSIM Quick Transfer.
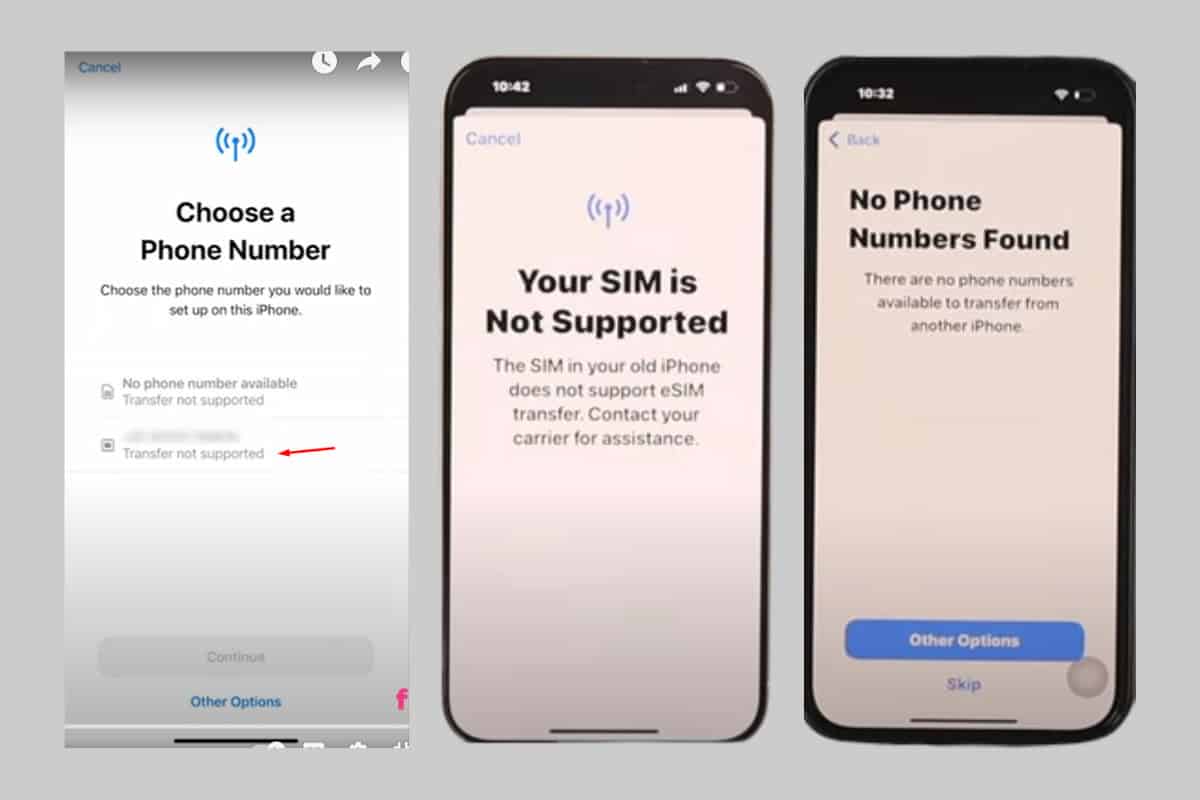
Below are some images illustrating a wireless carrier support and does not support eSIM Quick Transfer. These are steps during eSIM transfer process.
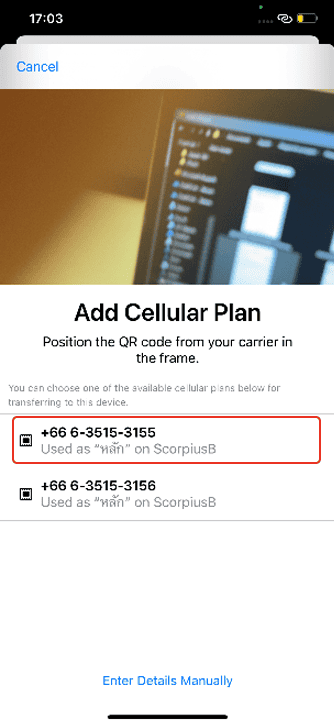
If you see Add cellular plan and there are phone numbers listed or something similar, it indicates that your carrier supports the automatic eSIM Quick Transfer.
Now we will go into detail each method to transfer eSIM from the previous iPhone to the new iPhone after setup.
II. What you need
Before you start the transfer, make sure you have the following:
- A new iPhone that is unlocked and eSIM compatible. You can check our updated list of eSIM supported devices and learn how to identify your iPhone model.
- A mobile carrier that supports eSIM.
- Both your iPhones have Apple ID matched with each other.
Pro Tip:
It is also recommended to perform a data backup on both iPhones to preserve your important information, like contacts or settings.
III. How to transfer an eSIM from iPhone to another with Quick Transfer
This eSIM transfer method works for eSIM profile from cellular carriers that support eSIM Quick Transfer feature. The requirement is that both iPhones must run on iOS 16 or later. Learn how to update your iPhone.
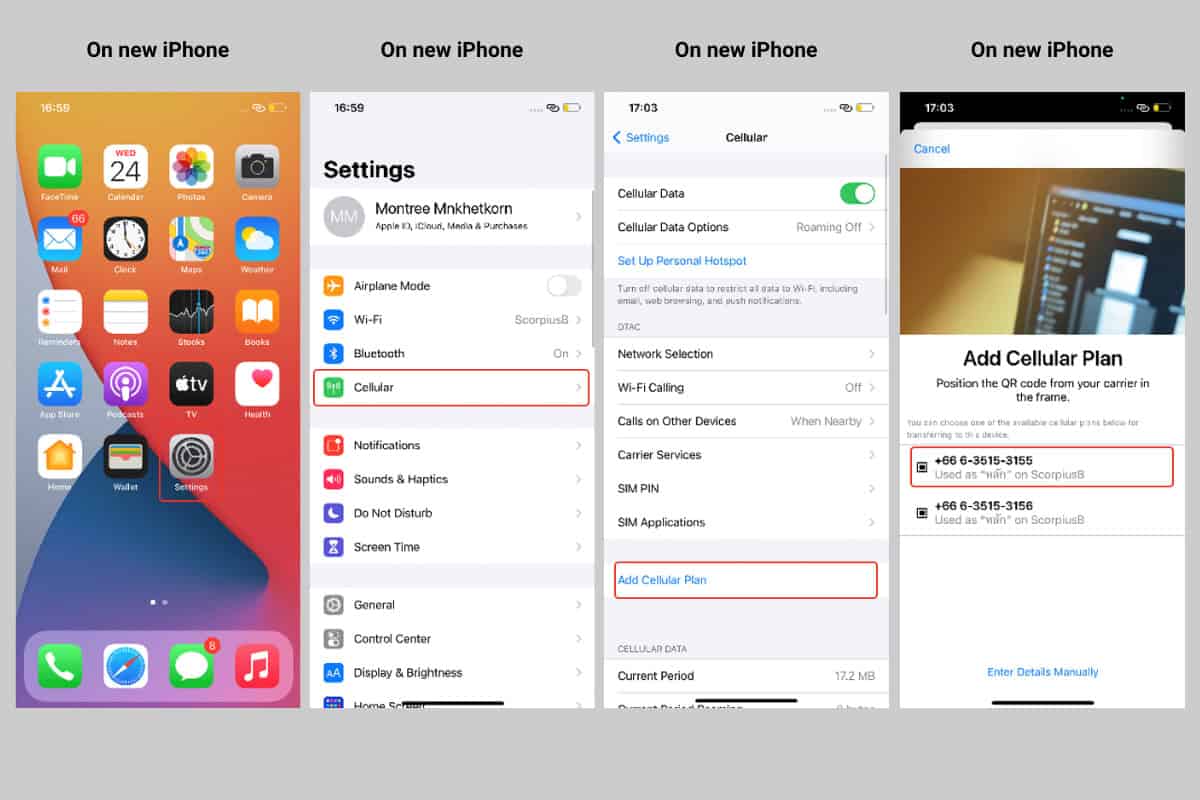
- On the new iPhone, go to Settings > Cellular > Add Cellular Plan
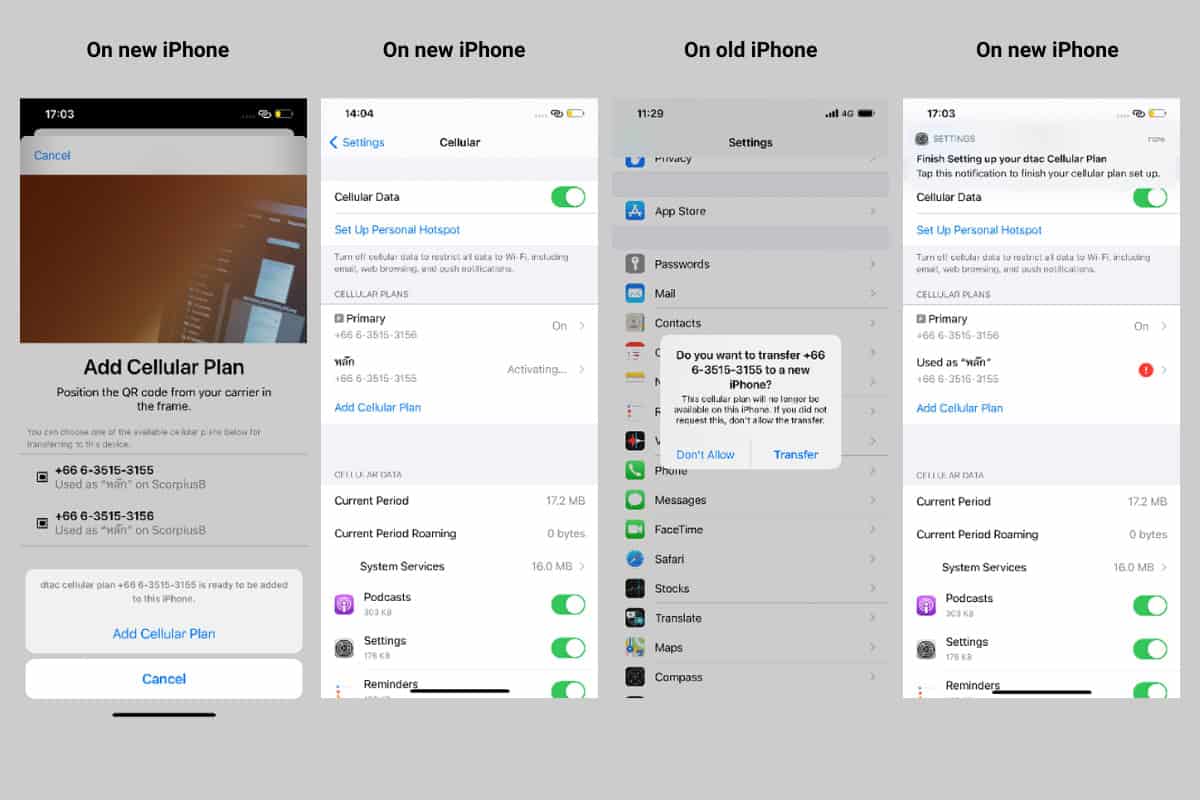
- If there are phone numbers (lines) from the old iPhone are listed > select Add Cellular Plan to initiate the transfer.
- If there is no list of phone numbers, select Transfer from Another Device.
- On the old iPhone, there will be a message asking you to transfer your eSIM to the new iPhone. Select Transfer to proceed.
- If asked for a verification code, enter the code displayed on the new iPhone onto the old iPhone.
- Wait for the eSIM to be activated on the new iPhone. Meanwhile, the eSIM on the old iPhone will be deactivated.
- If there is Finish Setting Up Your Carrier’s Cellular Plan banner on the new iPhone, select it.
- You then may be redirected to your wireless carrier’s website to complete the eSIM move process. If you need any help, contact your carrier.
IV. How to transfer eSIM from old iPhone to new iPhone via Bluetooth (iOS 16/17)
This eSIM transfer method is a new featured introduced by Apple to iPhones 15/14 series running on iOS 16/17.
You can take the following steps to transfer eSIM to the new iPhone via bluetooth:
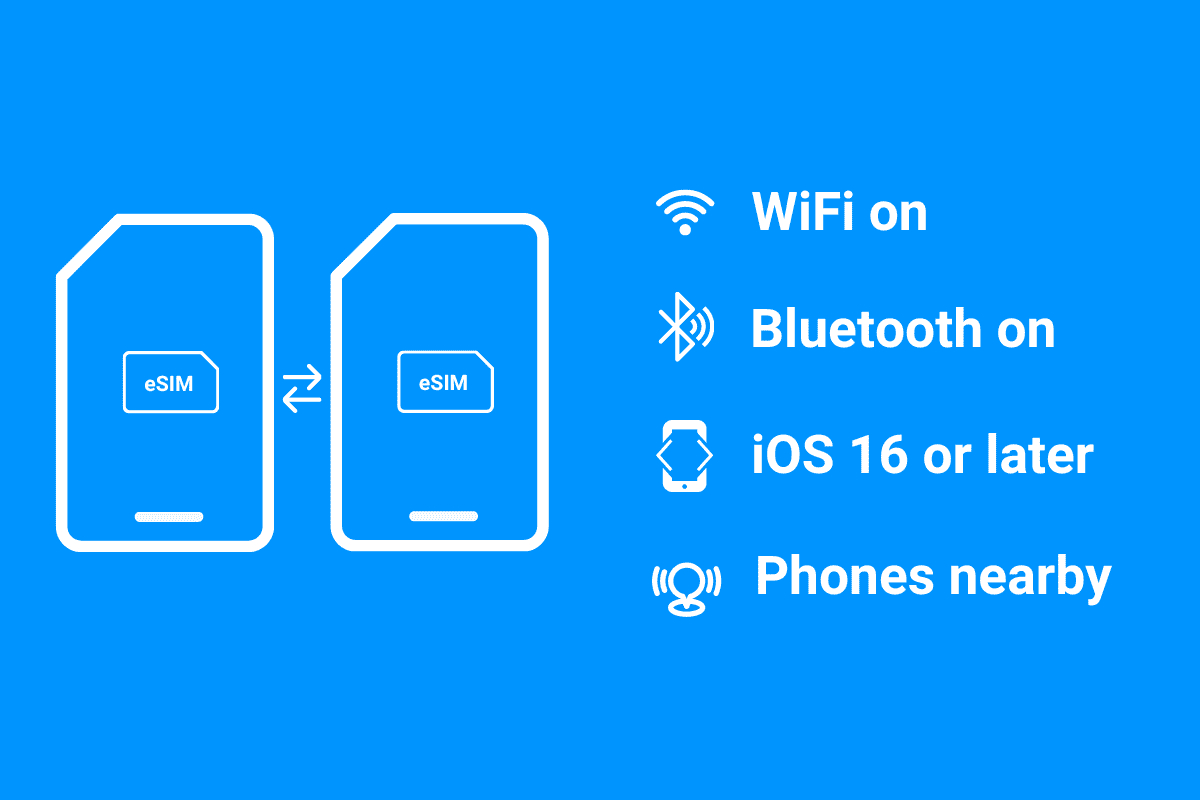
Requirements
- Both iPhones are passcode protected but unlocked
- Both iPhones have been updated to iOS 16 or later.
- Both iPhones are connected to WiFi and have Bluetooth turned on, and nearby each other.
Steps to transfer eSIM between iPhones via Bluetooth (iOS 16/17)
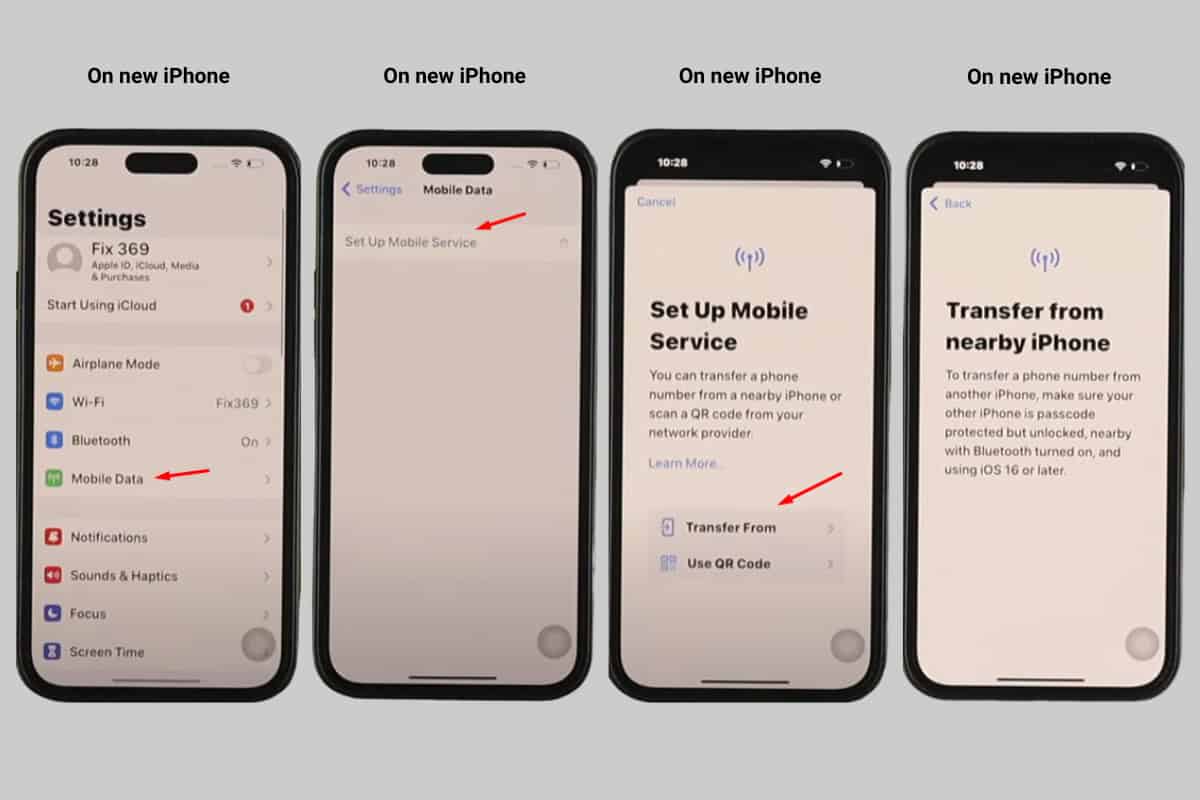
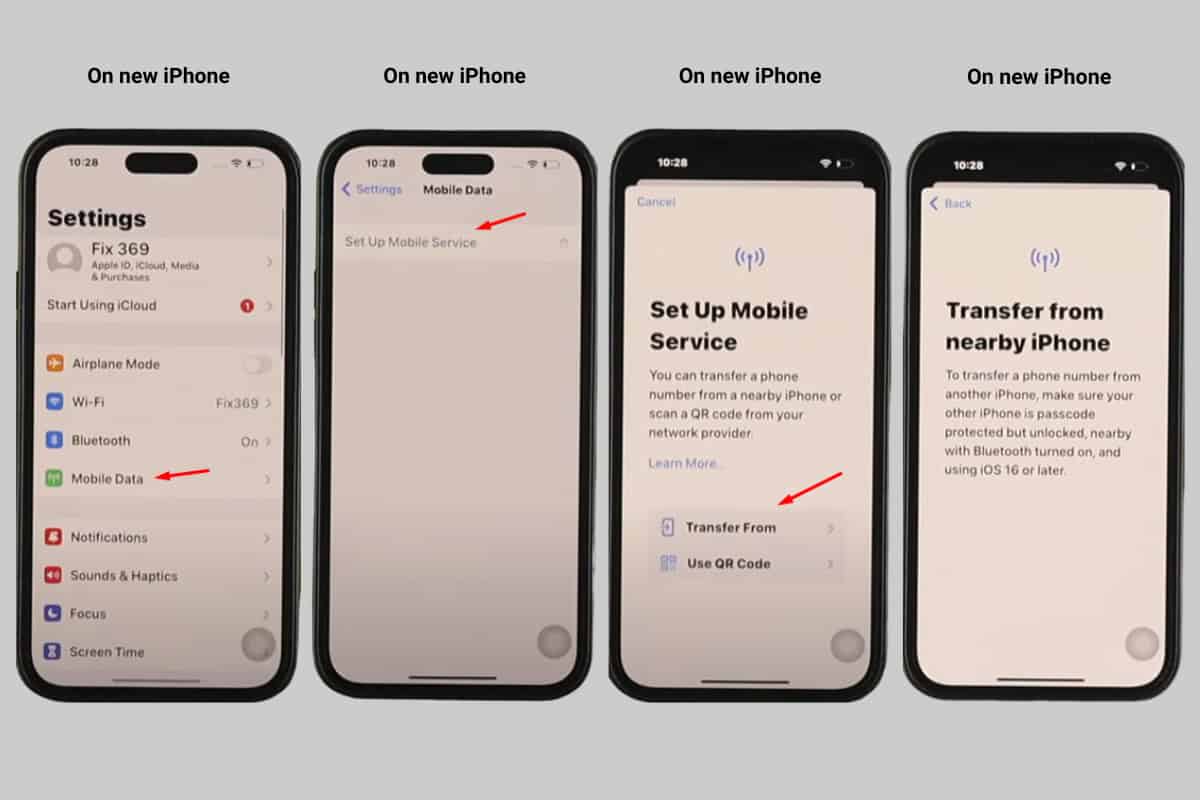
- On the new iPhone, go to Settings > Cellular > select Add Cellular Plan. If unavailable, look for Set Up Mobile Service / Set Up Cellular.
- From the Set Up Cellular screen, you will see two options: Transfer from another iPhone and Use QR code > Tap Transfer from another iPhone
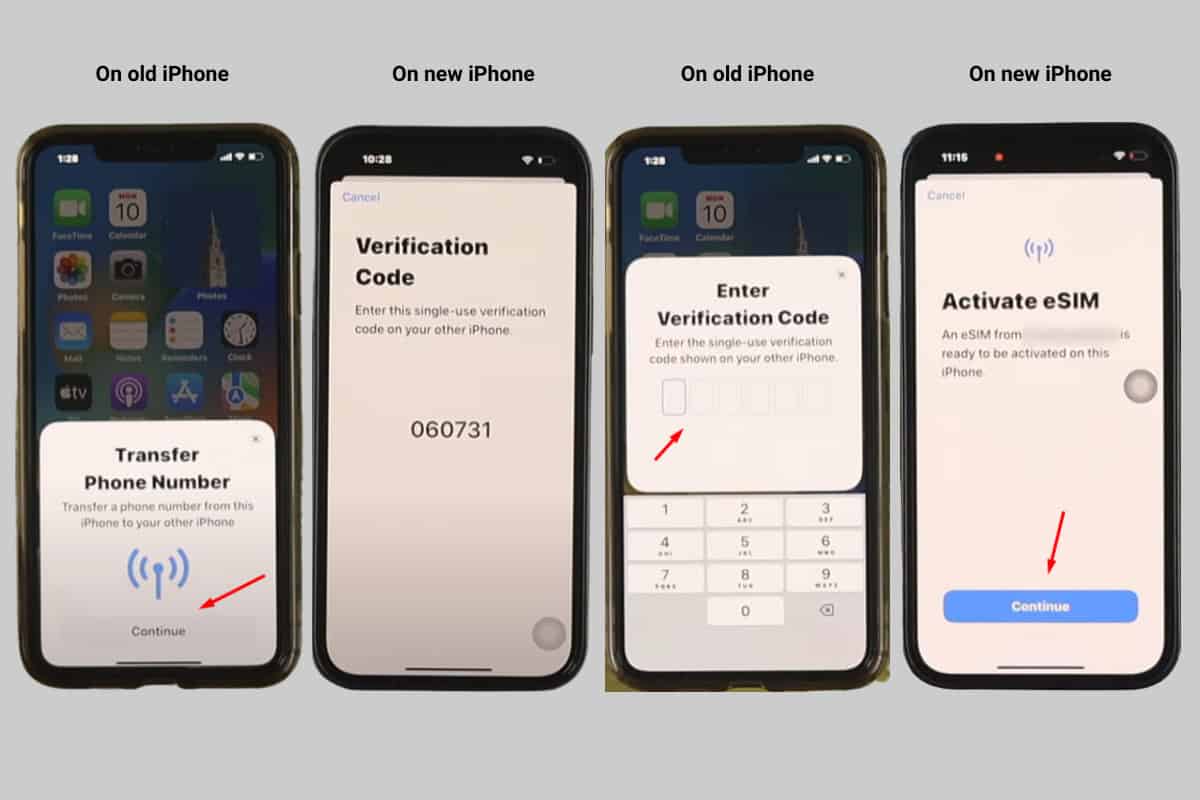
- On the old iPhone, you will see a notification to Transfer phone number > tap Continue
- On the new iPhone, you will see a verification code. Enter that activation code on the old iPhone.
- You will see a notification on the new iPhone saying Activate eSIM
- Tap Continue and wait for the eSIM to be activate on the new iPhone.
- On the new iPhone, the Cellular Set Up Complete appears > Tap Done.
- There, your eSIM has been transferred to the new iPhone successfully.
V. How to transfer eSIM from iPhone to another manually after setup
Manual eSIM transfer works if automatic transfer is not supported.
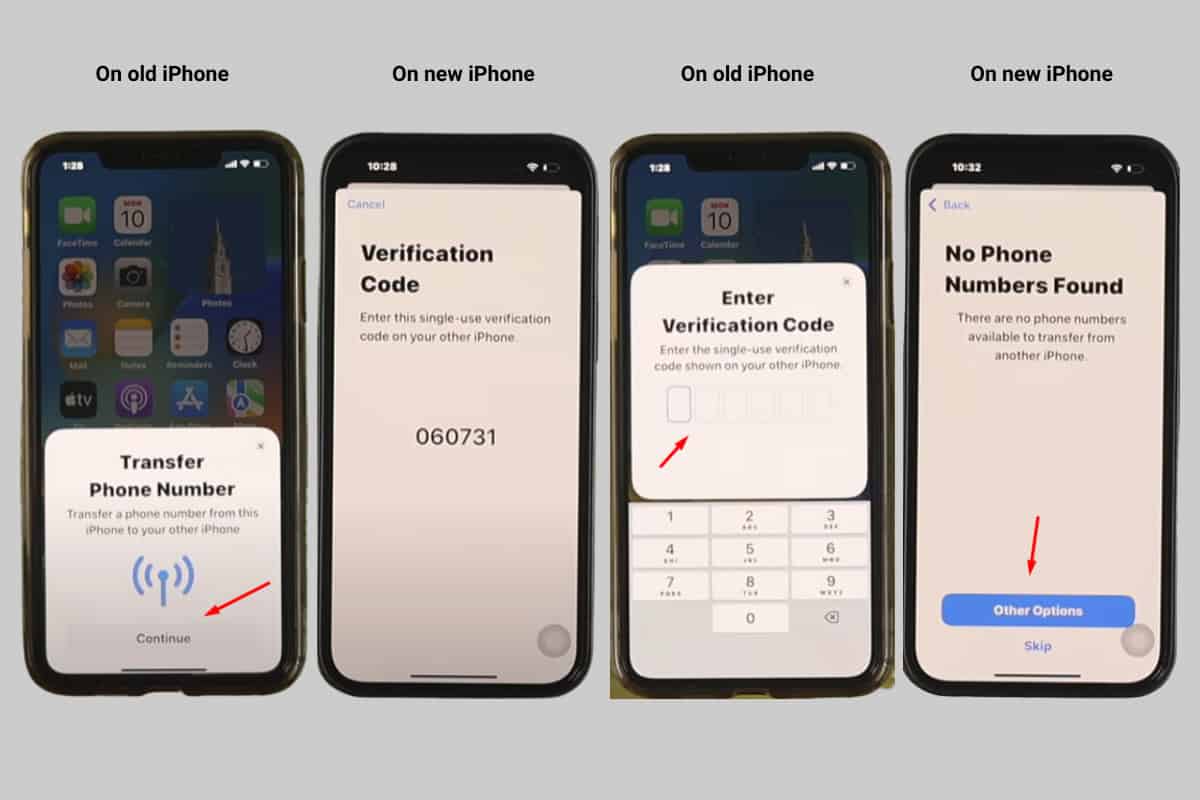
- After typing the activation code on the old iPhone, there will be an announcement saying Your SIM is Not Supported or No Phone Number Found or something alike. It means that your carrier does not support automated eSIM transfer.
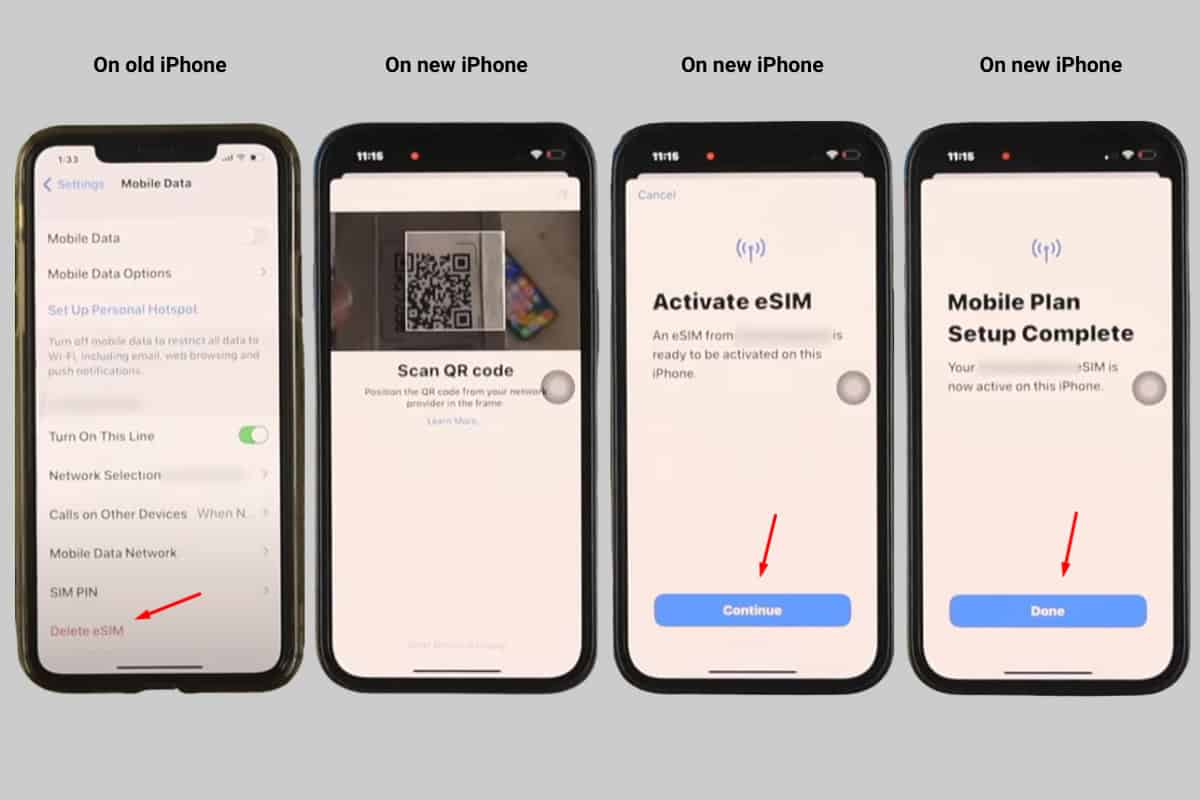
- On the old iPhone, deleting the existing eSIM by going to Settings > Mobile Data > Delete eSIM > Confirm it.
- On the new iPhone, go to Settings > Cellular > Add eSIM. If unavailable, select Set up Mobile Service / Set up Cellular.
- Select Use QR code
- Scan the QR code provided by your carrier to activate the eSIM on the new iPhone.
- On the new iPhone, the screen turns into Activate eSIM
- Wait for a while for activating and the Cellular Set Up Complete appears > Tap Done.
VI. Troubleshooting eSIM transfer issues – Reasons & Fix
Some common reasons why you can’t transfer eSIM to a new iPhone are:
- Outdated iOS
- Unstable WiFi / slow iPhone internet
- Bluetooth connection problem
- Bad or wrong configuration of the cellular plan
How to fix eSIM transfer issues:
1. Do basic checks
- Go to Settings > visit Face ID/Touch ID & Passcode options to check if the passcode is turned on your iPhones.
- Back to Settings > check if Bluetooth and WiFi is turned on.
- Ensure that both your iPhones are unlocked during the process.
- Place two devices close to each other.
2. Update to the latest iOS version
Updating the iOS to its latest version is simple but can fix eSIM transfer issues well.
Go to Settings > General > Software Update > Download and Install
The process will take several minutes, depending on the internet speed and download size.
3. Reset iPhone network
The cache in network settings can prevent the eSIM transfer. Reseting the network of your iPhones can fix the Internet.
- Go to Settings > General > Transfer or Reset iPhone
- Select Reset > Reset Network Settings
- Type the passcode if requested
- Tap Reset Network Settings if prompted
5. Restart the iPhone
You just need to turn off the iPhone and turn it on after 1-2 minutes.
6. Reset the iPhone
Resetting the whole iPhone will fix data / esIM transfer problems. But you need to back up data first to avoid losing any important information after reseting the device.
7. Contact your carrier/Apple support
This is the final solution if the issue persists. You can head to your carrier’s website and go to Contact Page to look for Hotline or Chat icon to present your problem.
Or you can also contact Apple by heading to Apple Support contact page. Choose the product (iPhone), select one of the issues mentioned in the list. Alternatively, you can go to “How would you like to get help?” section and tap on Chat / Phone call.
VII. FAQs
Where to get QR code?
You need to get the QR code from your carrier. Just contact them.
Do I need another QR code from my carrier or can I use the old one?
It depends. Some carriers allow users to use the QR code multiple times while some only give one-time QR code.
What if my new iPhone keeps saying it’s unable to transfer?
In that case, you need to delete the eSIM from the old iPhone and add it as the new eSIM on the new iPhone.
After deleting the eSIM on the old iPhone, what if the eSIM QR code is one-time code?
You need to contact your carrier for help. They will help fix the issue.


