Setting up an eSIM on a Huawei phone is straightforward and eliminates the need to swap physical SIM cards. This guide explains how to install and activate an eSIM on Huawei phones – both local and travel profiles.
In this article
I. Which Huawei phones are compatible with eSIM?
Only four models of Huawei have an eSIM chip that are accepted by most carriers:
Huawei P40
Huawei P40 Pro
Huawei Mate 40 Pro
Huawei Pura 70
Notes:
Models such as the P40 Pro+, P50, P60, etc. no longer have eSIM because of trade restrictions.
Even if the phone supports eSIM, you still need a carrier that allows Huawei eSIM profiles (not all do). For example, Huawei phones purchased in China are not compatible with eSIM.
II. How to check if your Huawei phone supports eSIM
You can check eSIM compatibility of a Huawei phone in 02 ways:
Open Settings menu and look for “Add eSIM” (or a similar option) in the mobile-network menu.
Alternatively, check the EID — the serial number of the eSIM chip. Go to Settings menu > select About phone > select Show EID. If an EID appears, the phone has eSIM hardware. If not, the phone does not support.
III. Before you start
Make sure your phone is network unlocked.
Connect to a reliable WiFi network
Have the eSIM details (QR code or activation strings) sent from the provider such as Gigago through email or app
Notes:
You can install an eSIM in three ways:
Scan the QR code sent by your carrier and follow the on-screen prompts.
Scan a saved QR image: save the code to your phone, tap “Choose from Gallery” when prompted, and pick the file.
Enter the activation code manually (SM-DP+ address + code).
Do not delete the eSIM after installation. Most providers will not allow you to download it again.
IV. How to set up eSIM on Huawei phones
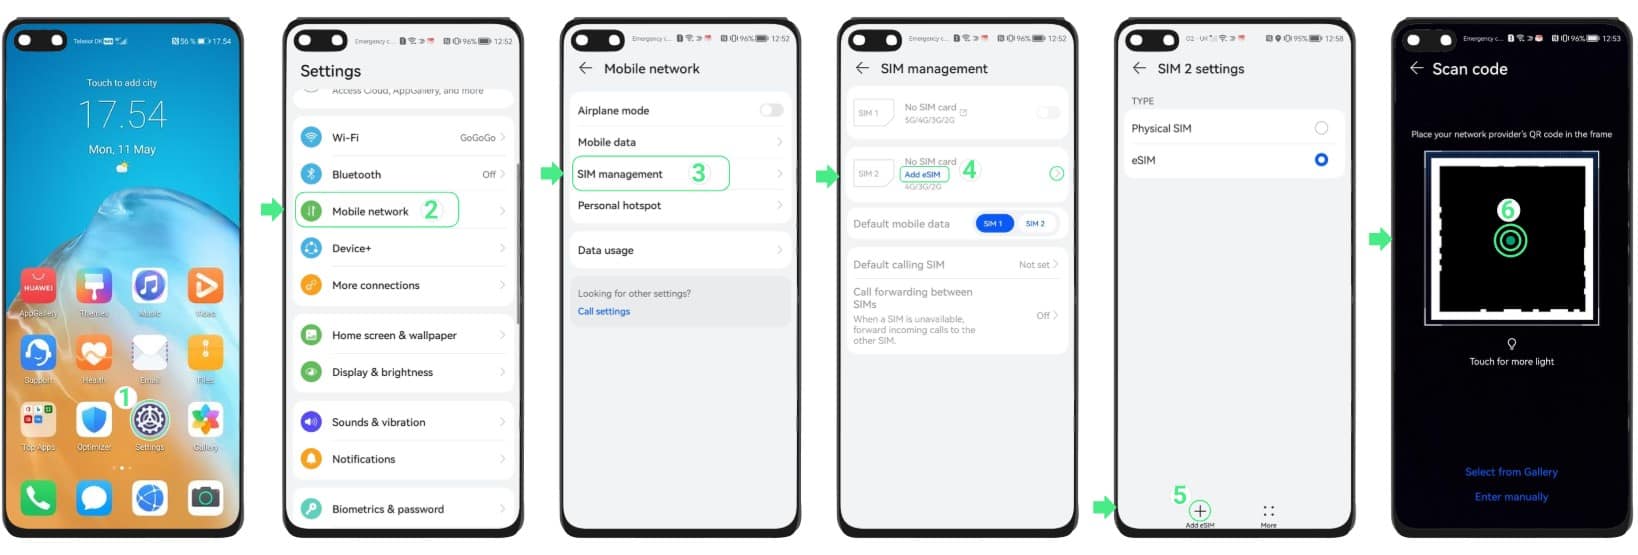
1. Scan the QR code
Go to Settings > Mobile networks > SIM Management > Add eSIM and switch the eSIM toggle ON.
Select the “+” icon at the bottom-left corner
Scan the QR code
Wait till you see the “eSIM added” message appears – do not close the screen during installation.
Stép by setting up eSIM on Huawei phone by scanning a QR code
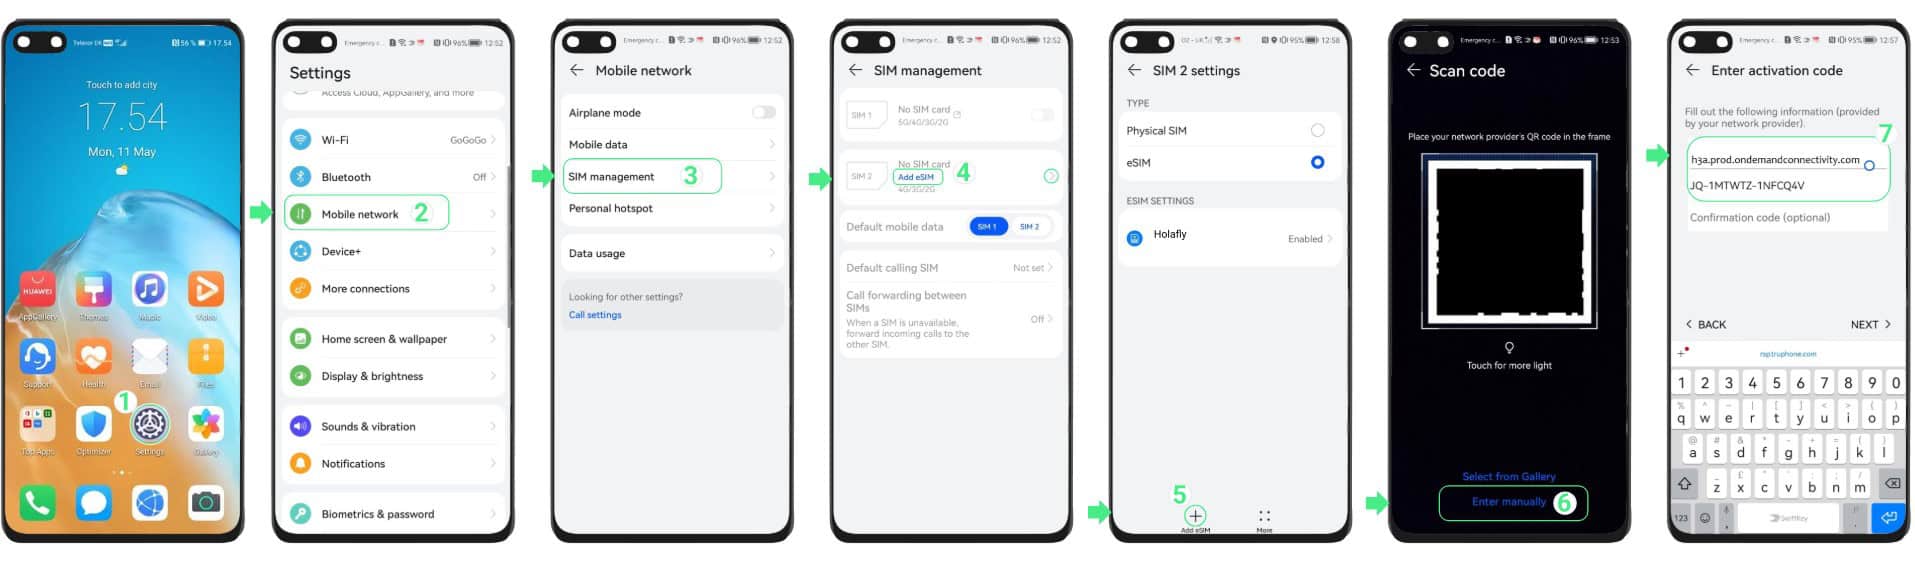
2. Install manually (enter SM-DP+ Address)
If the QR code cannot be scanned, you can enter the activation code manually:
Go to Settings > Mobile networks > SIM management → Add eSIM.
Enable the eSIM toggle.
Tap the “+” , then select Enter manually.
Paste the full activation string you received (SM-DP+ server + activation code).
Tap Next and choose Add eSIM and wait for the profile to download.
Steps to set up eSIM on Huawei phone by entering activation code
For local eSIMs that work as alternatives to regular domestic SIMs, you can start using them after installation. Travel eSIMs such as Gigago eSIM require an extra step to activate the eSIM when you arrive abroad.
V. How to activate Gigago eSIM on Huawei phones
You need to take 3 main steps:
Set Gigago eSIM as default line for data: Go to Settings > Mobile networks > SIM management > choose the Gigago eSIM for “Mobile data”.
Turn off your primary SIM for data to avoid roaming fees.
Activate data on Gigago eSIM: Go to Settings > Mobile networks > turn on Mobile data and Data roaming
Now your phone will connect to the partner network.
Note: Some networks need up to 5 minutes for first eSIM registration. So be patient.
The 2026 FIFA World Cup runs from June 11 to July 19 — and it’s the most logistically complex tournament in football history. 48 teams. 104 matches. 16 cities. 3 countries. 39 days. If you’re flying in from overseas, this isn’t a weekend trip. It’s a multi-country expedition that punishes poor planning and rewards fans […]
The Da Nang International Fireworks Festival (DIFF) 2026, themed “United Horizons”, will transform the Han River into a world-class stage from May 30 to July 11, 2026. Featuring 10 elite teams, this 6-night festival is more than just a show—it’s a city-wide celebration. It just made Travel + Leisure’s Top 9 Must-Experience Festivals on the […]
Google Maps is widely used globally for navigation and location-based services, but in China it is blocked. For years, the “Great Firewall” has made navigating China a puzzle for Western tourists. While the digital landscape in China is unique, you don’t have to navigate it blind. This article will answer the questions: Does Google Maps […]
With the release of iOS 18, many travelers are wondering: “Does iOS 18 support eSIM?” or “Will the new update affect my travel connectivity?” This guide provides everything you need to know about using eSIM on the latest Apple operating system for a seamless international journey. I. Does iOS 18 Support eSIM? YES. Apple still […]
When you are traveling abroad, nothing is more frustrating than seeing “No Internet Connection” or having signal bars but no internet just as you’re trying to open maps or message someone. If your cellular data stops working, don’t panic — most problems are easy to fix. Whether you’re using a local SIM or an international […]
When you’re traveling abroad, staying connected is essential. You need reliable internet for maps, language translation, ride-hailing apps, or staying in touch with family and friends. But, what speed should you actually expect when traveling abroad? Let’s break down what “normal” mobile internet speed looks like, why it matters, how to test your connection, and […]