An SM-DP+ address is the specific server URL your phone connects to when downloading an eSIM profile.
Most travelers never see it because scanning a QR code handles everything automatically. However, if your camera cannot scan the code, due to glare, a small printout, or installing on a second device, you can enter the SM-DP+ address by hand.
This guide explains what an SM-DP+ address is, how it works, where to find yours, and how to enter it manually on iPhone, Samsung Galaxy, and Google Pixel devices.
In this article
What is SM-DP+ Address?
SM-DP+, standing for Subscription Manager Data Preparation Plus, is a technology used in mobile networks to securely manage and activate SIM cards (or eSIMs) for your mobile devices, such as smartphones or tablets.
It is a secure server defined by GSMA standards that prepares and delivers your eSIM network settings to your phone over the internet.
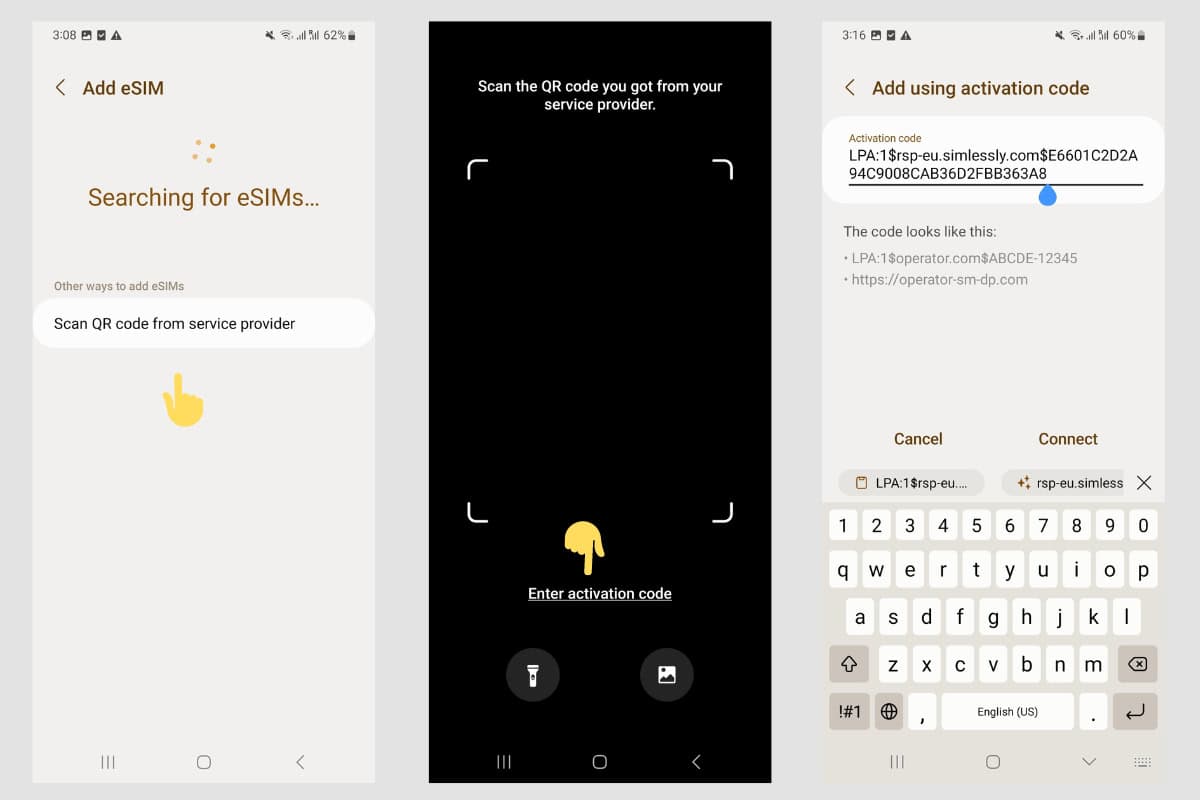
When you set up an eSIM manually, your phone sends your activation code to this address to request and download your specific profile.
Example of SM-DP+ address
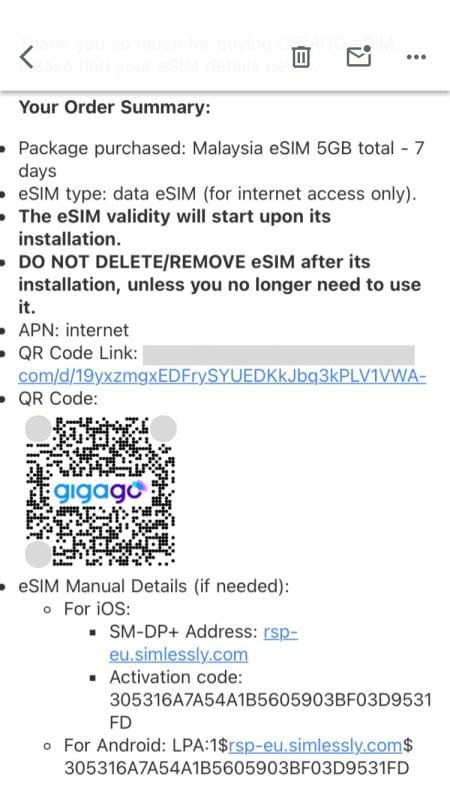
Here is the example of SM-DP+ address of an eSIM from Gigago.com:
SM-DP+ Address = rsp-eu.simlessly.com
Activation code: 305316A7A54A1B5605903BF03D9531
Gigago eSIM – SM-DP+ Address
How Does SM-DP+ Address Work?
The SM-DP+ Address is part of Remote SIM Provisioning, the industry standard set by the GSMA that lets phones download a SIM profile over the internet instead of requiring a physical card. Think of it as the address your phone’s eSIM software contacts to say “here is my activation code, please send me my profile.”
When you buy a new phone or a new SIM card, the mobile network assigns a specific SM-DP+ Address to that specific SIM card. This address is like a digital location where your SIM card is registered.
Why is SM-DP+ Address Important?
In theory, the SM-DP+ Address is required to establish a secure connection with the mobile network operator. It allows the mobile network to send essential information to your SIM card or eSIM.
Without SM-DP+ Address, your device will not know where to fetch its (e)SIM profile from. This information can include things like your phone number, network settings, and data plans. By sending this information to your SIM card’s SM-DP+ Address, the mobile network ensures that your SIM card is properly activated and ready to use.
This significance is particularly important in the current circumstances where data security and cyber threats are main concerns.
Your eSIM provider sends your SM-DP+ address alongside your QR code, usually in your purchase confirmation email.
If you bought a Gigago eSIM, this email typically arrives within 3 to 5 minutes of payment. It contains:
The QR Code (for automatic setup)
The SM-DP+ Address (written as text, e.g., rsp.esimprovider.com)
The Activation Code (a long string of letters and numbers)
Note: SM-DP+ addresses and activation codes are unique to your specific purchase. Always copy the exact text from your confirmation email rather than using example codes found online.
How to Enter an SM-DP+ Address Manually
1. On iPhone
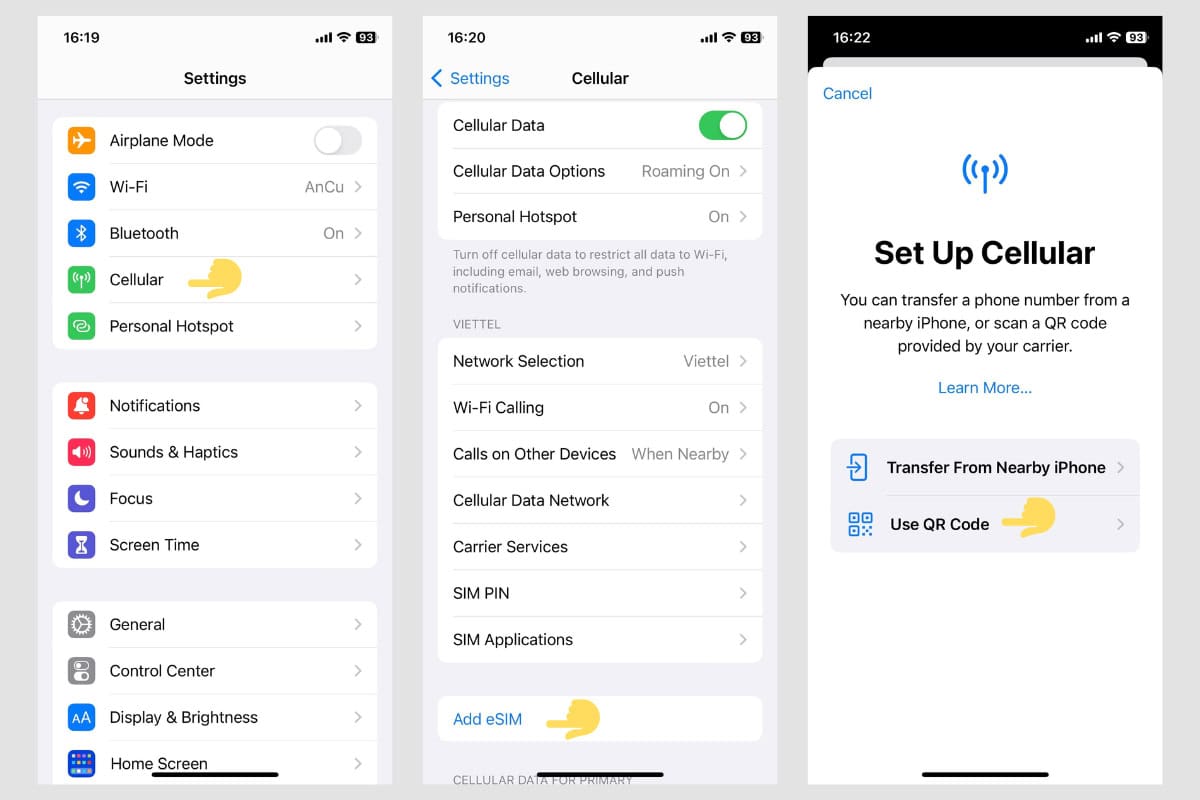
Open Settings >Cellular (or Mobile Data).
Tap Add eSIM (or Add Cellular Plan).
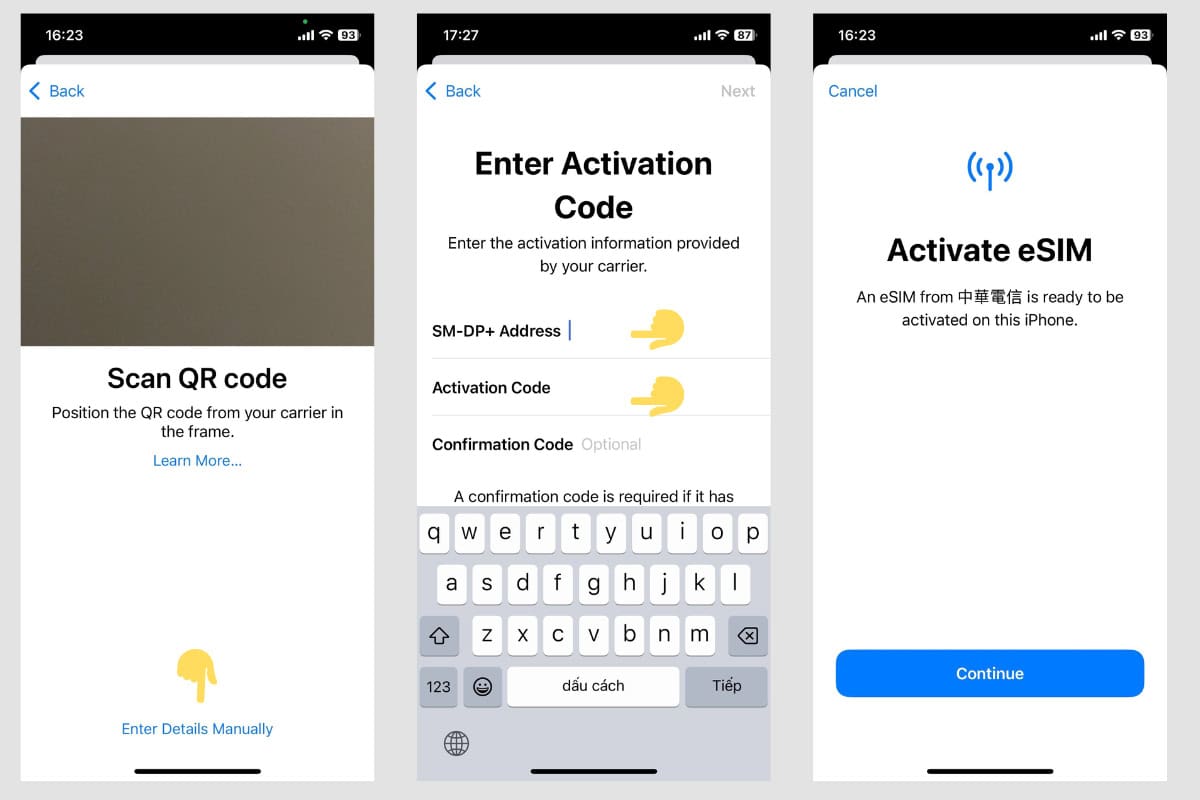
Select Enter Details Manually at the bottom of the screen.
Type or paste your SM-DP+ Address and Activation Code.
Enter a Confirmation Code only if your provider explicitly requires one.
Follow the on-screen prompts to label your plan and set default lines for voice and data.
2. On Samsung Galaxy
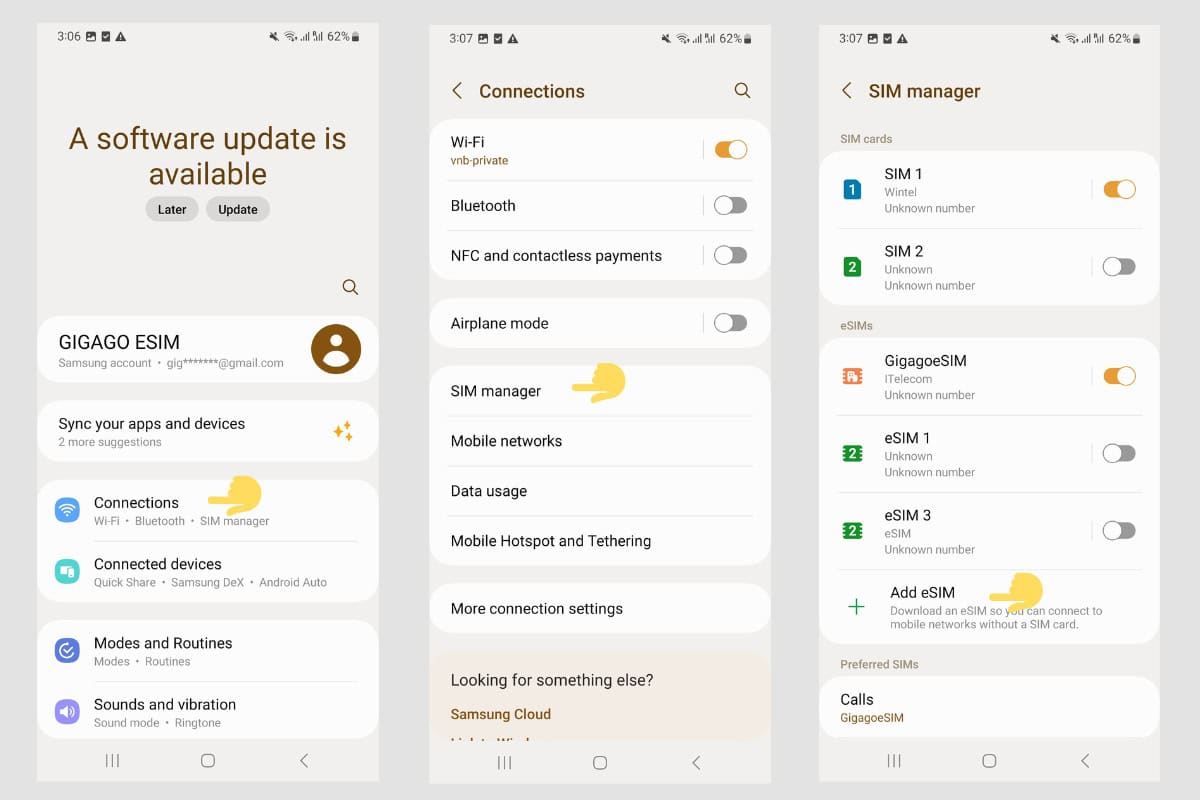
Open Settings > Connections > SIM Manager.
Tap Add eSIM.
Choose the manual entry option instead of scanning.
Enter your SM-DP+ Address and Activation Code.
Note: Samsung’s menu names differ from iOS, so ensure you are inside the SIM Manager menu before attempting setup.
3. On Google Pixel & Other Android Devices
Open Settings > Network & Internet.
Tap the + (plus icon) next to SIMs or Mobile Network.
Select Download a SIM instead?.
When the scanner opens, tap Need help? at the bottom, then choose Enter it manually.
Paste your SM-DP+ Address and Activation Code.
For other Android brands, look for the SIM or Mobile Network menu inside your main Settings app.
Do You Actually Need to Set This Up Manually?
Usually, no. Manual entry is strictly a fallback method. Before entering details manually, check these quick troubleshooting steps:
Confirm your phone is carrier-unlocked and eSIM-compatible.
Ensure you have a stable Wi-Fi or cellular data connection.
Verify that you haven’t already installed the eSIM profile in a previous attempt.
Frequently Asked Questions
What is the difference between an SM-DP+ address and an activation code?
The SM-DP+ address tells your phone where to go (the server location), while the activation code identifies which specific eSIM plan belongs to you on that server. You need both to complete a manual installation.
Can I reuse my SM-DP+ address and activation code on another phone?
No. Most eSIM activation codes, including Gigago’s, re designed for a single installation on one device. If you delete an eSIM profile or try to transfer it to a new device using the same code, the activation will fail. Always install the eSIM directly on the phone you intend to use while traveling.
What if manual entry still fails?
First, check for typos or extra spaces in your pasted text, as this is the most common cause of errors. Next, ensure your phone is unlocked and connected to working Wi-Fi. If it still fails, contact your provider’s support team (such as Gigago Support) for direct assistance with your profile.
Conclusion
An SM-DP+ address is simply a background system that connects your phone to your eSIM provider’s server.
While scanning a QR code remains the fastest installation method, knowing how to find and enter your SM-DP+ address ensures you can easily get connected if your camera ever fails to scan.
One of the most common questions travelers have before using an eSIM is “Does time zone affect your travel eSIM’s validity period?” whether changing time zones will shorten their data plan. If you buy a 7-day eSIM, fly across multiple countries, or cross the International Date Line, it’s natural to wonder whether changing time zone […]
The iPhone 18 Pro and iPhone 18 Pro Max are eSIM-only in 12 countries and regions, including the United States, Canada, Japan, and Mexico. Models sold in many other markets, including Europe, the UK, Australia and most of Asia still have a physical nano-SIM tray alongside eSIM support. If you’re traveling internationally with an eSIM-only […]
Short answer: No, if you are visiting multiple countries on a single trip, you do not need to buy a separate SIM card for every border you cross. By installing one regional or global eSIM before you depart, your phone automatically switches to a supported local network as soon as you arrive in a new […]
The 2026 FIFA World Cup runs from June 11 to July 19 — and it’s the most logistically complex tournament in football history. 48 teams. 104 matches. 16 cities. 3 countries. 39 days. If you’re flying in from overseas, this isn’t a weekend trip. It’s a multi-country expedition that punishes poor planning and rewards fans […]
The Da Nang International Fireworks Festival (DIFF) 2026, themed “United Horizons”, will transform the Han River into a world-class stage from May 30 to July 11, 2026. Featuring 10 elite teams, this 6-night festival is more than just a show—it’s a city-wide celebration. It just made Travel + Leisure’s Top 9 Must-Experience Festivals on the […]
Google Maps is widely used globally for navigation and location-based services, but in China it is blocked. For years, the “Great Firewall” has made navigating China a puzzle for Western tourists. While the digital landscape in China is unique, you don’t have to navigate it blind. This article will answer the questions: Does Google Maps […]