Install and Activate eSIM on iPhone
Before eSIM installation and activation
1. Ensure your device is eSIM-compatible and carrier-unlocked. Check out if your iPhone supports eSIM.
2. You must have the QR Code on another screen or device or a printed paper to scan it with your phone camera.
3. Ensure that your internet connection remains stable throughout the entire process
4. The QR code or manual installation can only be scanned ONCE.
5. DO NOT remove the eSIM from your device because it cannot be used again.
Installation with QR code
Check your email
Open your email and find the email we sent you with the QR code. If you have not received your code, contact us.
Scan the QR code
Open your camera and scan the code, or navigate to “Settings” > “Mobile Data” > “Add Data Plan” to scan the code from there.
Follow installation steps
Scan the QR code to start the installation process. Use our guide below for step-by-step configuration.
Steps to install and activate eSIM
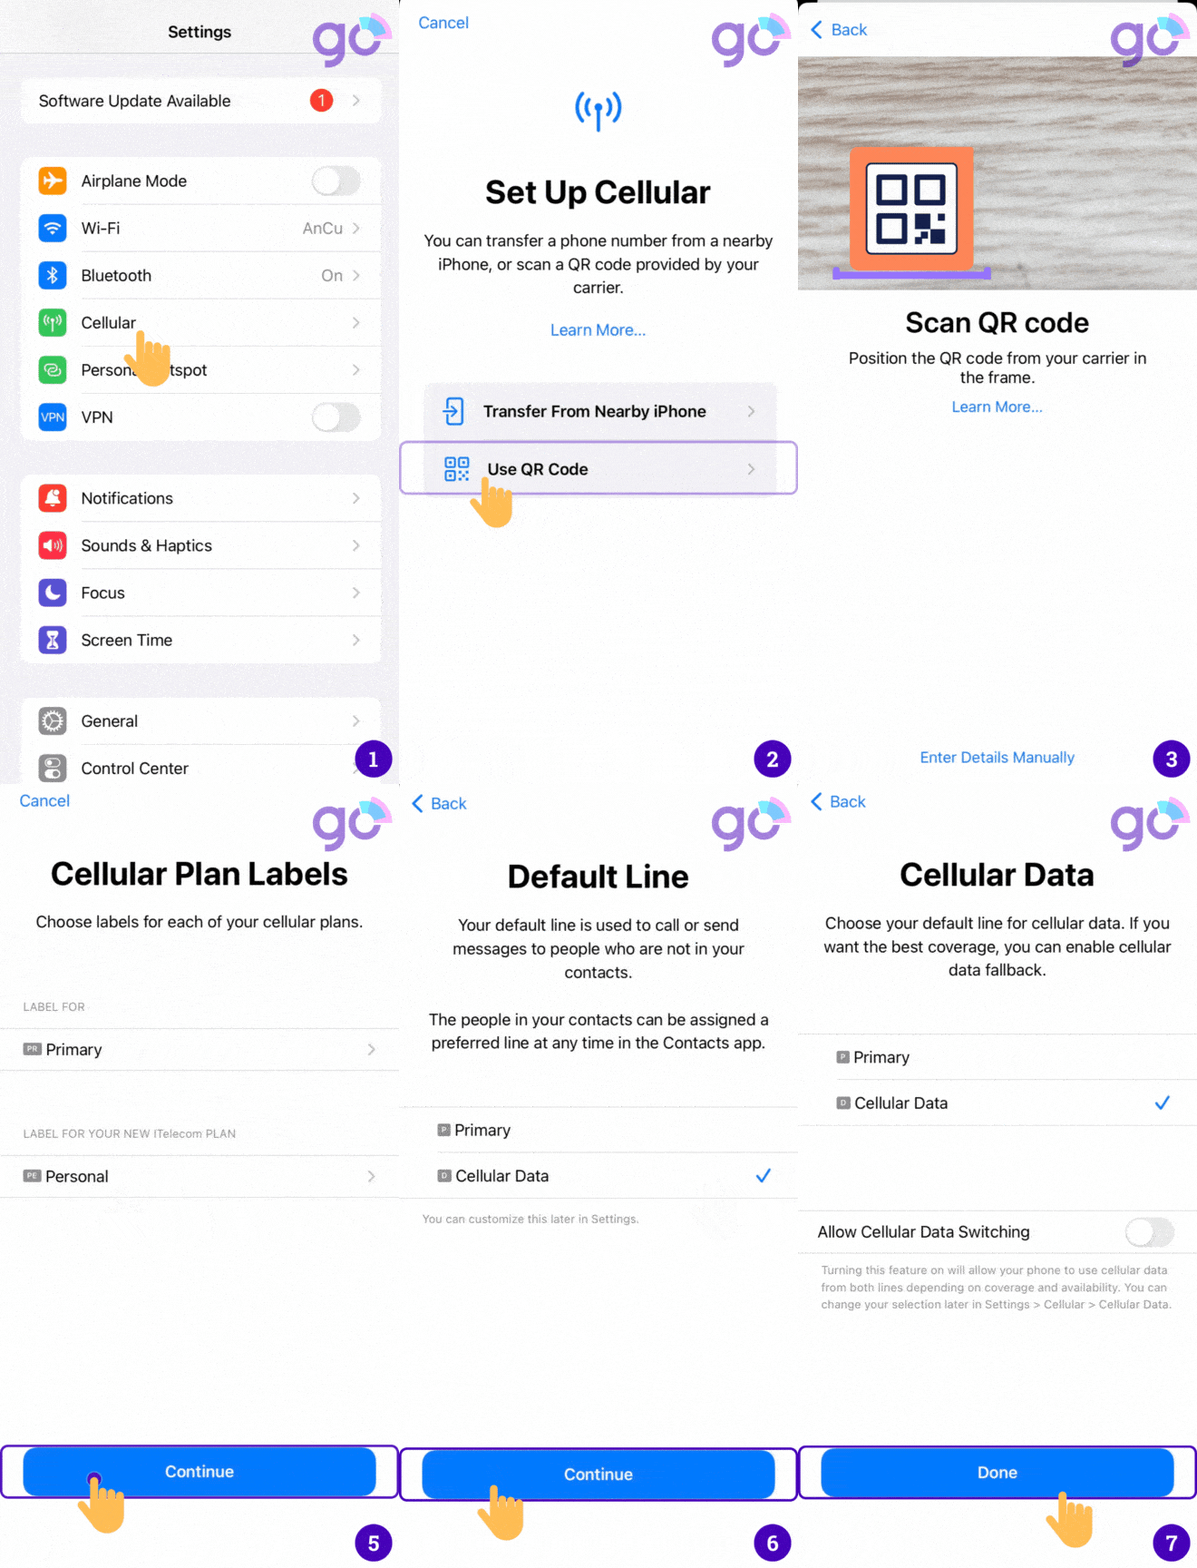
- Step 1: On your iOS device, go to Settings > Cellular.
- Step 2: Select Add Data/Cellular Plan/Add eSIM.
- Step 3: Scan the eSIM QR code that you have received.
- Step 4: Choose Add Cellular Plan button to save the eSIM details.
- Step 5: On the screen named Cellular/Mobile Data Plan Labels, select the available label (like Secondary, Business, Travel,… ) or Label your eSIM profile as you want (i.e. Gigago eSIM), and tap Continue.
- Step 6: Set your eSIM profile as the Default Line (if your data eSIM comes with a phone number) or select your Primary number if your data eSIM does not come with a phone number), then choose Continue.
- Step 7: Set your eSIM profile as the default Cellular Data > choose Done.
- Step 8: Turn on Data Roaming to start using your eSIM. (We recommend you to do this when you arrive at your destination).

* Notes: Detailed guides for each eSIM plan will be sent in the email after purchasing.
Install manually
Check your email
Open your email and find the email we sent you with the SM-DP+ address and activation code. If you have not received your code, contact us.
Scan the QR code
Open your camera and scan the code, or navigate to “Settings” > “Mobile Data” > “Add Data Plan” > “Scan QR code” > “Enter activation details manually”
Follow installation steps
Enter the SM-DP+ address and activation code to start the installation process. Use our guide below for step-by-step configuration.
Steps to install eSIM manually
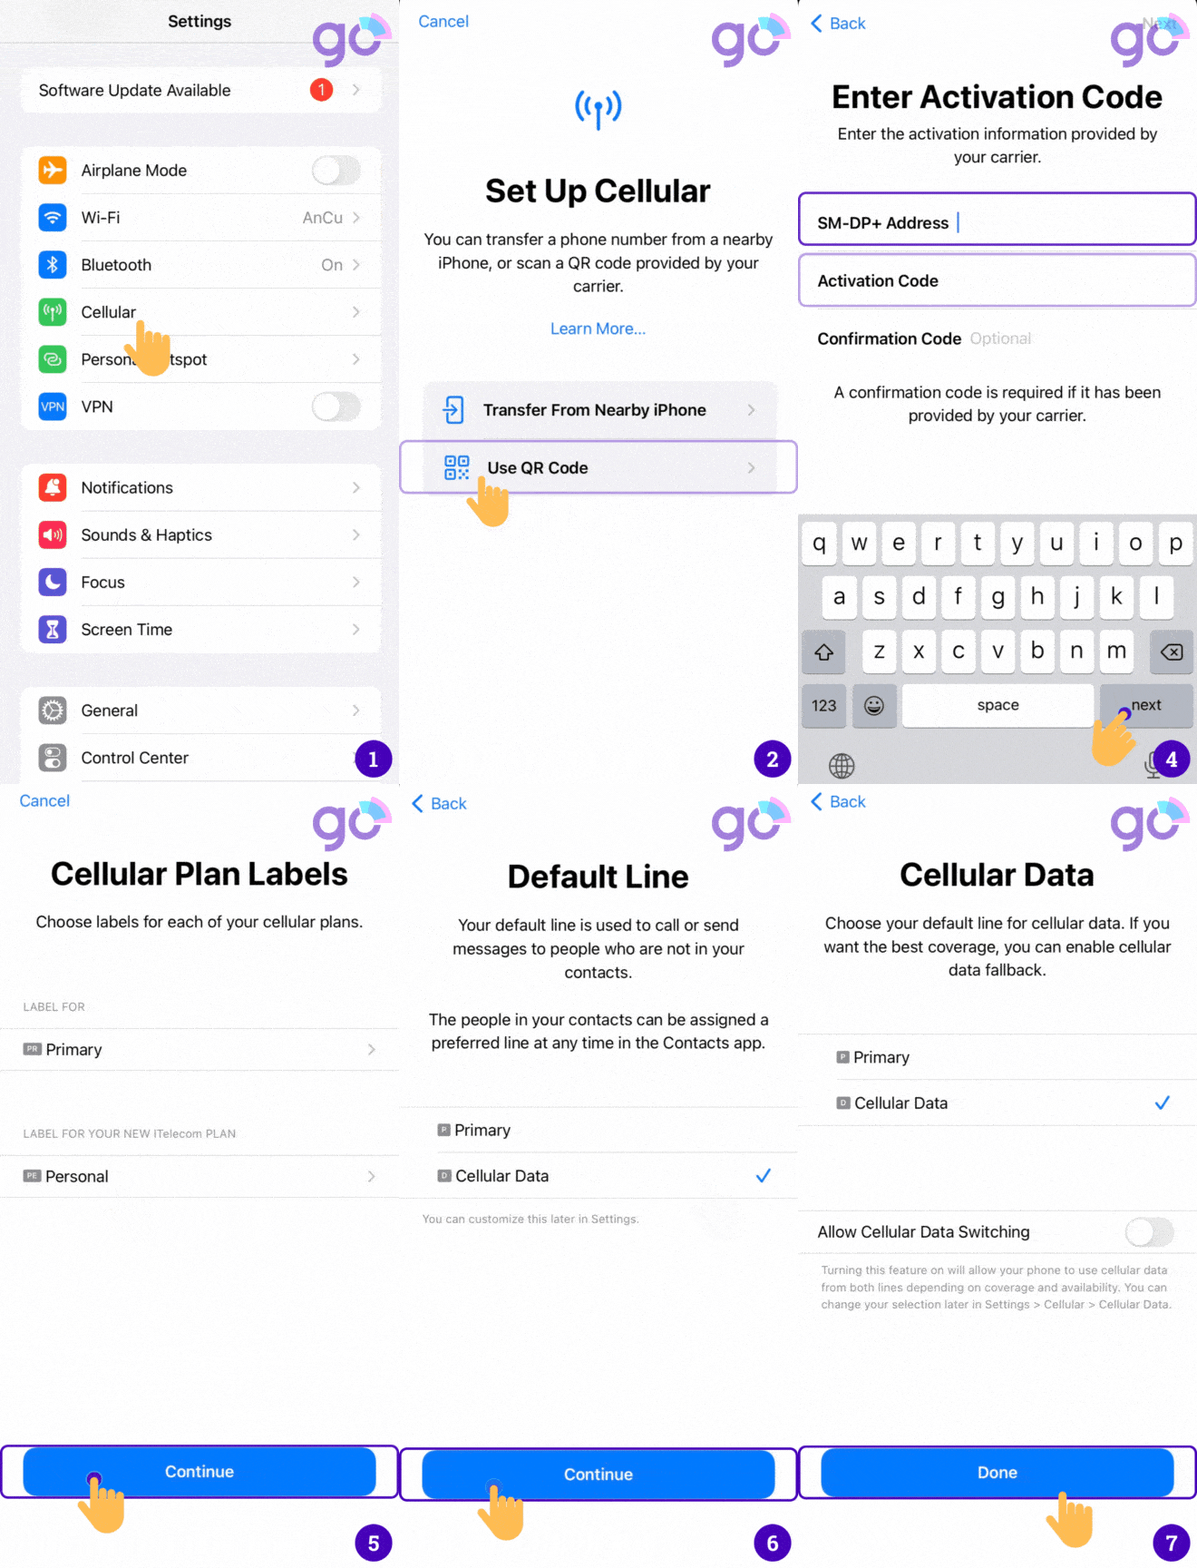
- Step 1: On your iOS device, go to Settings > Cellular.
- Step 2: Select Add Data/Cellular Plan.
- Step 3: If you cannot scan the QR code sent by your eSIM provider due to a certain reason, you can still activate your eSIM manually by selecting Enter Details Manually.
- Step 4: Enter the required information including
- SM-DP+ Address
- Activation Code
- Confirmation Code (if required)
- Then, select Next.
- Step 5: On the screen named Cellular/Mobile Data Plan Labels, select the available label (like Secondary, Business, Travel,… ) or Label your eSIM profile as you want (i.e. Gigago eSIM), and tap Continue.
- Step 6: Set your eSIM profile as the Default Line (if your data eSIM comes with a phone number) or select your Primary number if your data eSIM does not come with a phone number), then choose Continue.
- Step 7: Set your eSIM profile as the default Cellular Data > select Done. Switch off the Allow Cellular Data Switching to avoid roaming charges.
- Step 8: Turn on Data Roaming to start using your eSIM.

* Notes: Detailed guides for each eSIM plan will be sent in the email after purchasing.
How to Use your eSIM on iPhone
After installation, to turn on eSIM on iPhone when landing in Gigago, you need:
- Step 1: Go to Settings, and tap Cellular/Mobile Data (depending on your device)
- Step 2: Choose your eSIM (under “Cellular Plans”) and switch on both the Turn On This Line (open Settings > Mobile/Cellular Data) and Data Roaming (open Settings > Mobile/Cellular Data > Mobile Data Options).
Congratulations! Your plan has now been installed and is ready to use.
Frequently asked questions
You can use 2 following ways to check:
1. Make sure that there is at least one bar in the signal icon on your iPhone.
2. Go to “Settings” on your iPhone, select “Mobile Data”, click on the option that you have labelled before and check that “Data Roaming” is turned on.
You might need to erase your eSIM if:
- You transferred the eSIM’s phone number to another iPhone.
- You’re going to sell, exchange, or donate your device.
Don’t erase your eSIM as a troubleshooting step, contact eSIM Gigago if you need support when having problems with your eSIM.
If you erase your eSIM, you’ll need a new one. Then set up your new eSIM.
Now let’s check out how to remove an eSIM from your device:
- Step 1: Go to Settings > Cellular.
- Step 2: Select the plan you want to remove.
- Step 3: Select Remove Cellular Plan. Then, confirm your selection.
In case you cannot connect to the internet, please adjust your phone APN (access point name) by:
- Step 1: Go to Settings
- Step 2: Tap Cellular or Mobile Data (depending on your device)
- Step 3: Select your eSIM which has enabled Turn On This Line and Data Roaming
- Step 4: Tap Cellular Data Network or Mobile Data Network (depending on your phone)
- Step 5: Enter the value sent by your eSIM provider (i.e. ctm-mobile) on all APN fields (Cellular/Mobile data, and Personal Hotspot) or a different value if you use eSIM from another provider. The other fields are left blank.
You can store multiple eSIMs on your iPhone, but only one can be activated simultaneously.
If you want to change the eSIM, follow these steps:
- Open Settings > Cellular Data / Mobile Data (depending on your phone).
- Choose the eSIM you want to use (under the field “Cellular Plans“).
- Tap Turn on this line.
You might need to erase your eSIM if:
- You transferred the eSIM’s phone number to another iPhone.
- You’re going to sell, exchange, or donate your device.
Don’t erase your eSIM as a troubleshooting step, contact eSIM Gigago if you need support when having problems with your eSIM.
If you erase your eSIM, you’ll need a new one. Then set up your new eSIM.
Now let’s check out how to remove an eSIM from your device:
- Step 1: Go to Settings > Cellular.
- Step 2: Select the plan you want to remove.
- Step 3: Select Remove Cellular Plan. Then, confirm your selection.
Although you can have multiple eSIM profiles on one iPhone (upto 20), it is recommended that you should install 3-4 eSIM on each device. There will only ever be 1 active eSIM profile, though.
iPhone from XS models and newer models have dual SIM features with an eSIM and a physical SIM card.